 A L I D A
1. Introduction
This post explains how to build C++/Python development environment through Vim editor on Linux. In this post, vim's code navigations plugin used youcompleteme and vim-lsp, and youcompleteme was a uniquely powerful code navigation plugin in vim before the vim-lsp came out in 2016. However, as vim-lsp supporting various programming languages appeared, both are now widely used.
As of now(2020.09), the installation process of youcompleteme is simple, but the setting is a little complicated, whereas the installation process of vim-lsp is a bit complicated due to the problem of vim and clang version problems, but after installation it can be used very simply. As a result of actual testing, there was no difference in speed and functionality between the two plugins, adn using either one alone provides sufficient functionality indenpendently, so you can use the any configuration of the two. vimrc1(ycm), vimrc2(vim-lsp)
The font of the vim editor is Hack and the theme is codedark. Most of the contents are explained through C++ code, but the same functions apply when using Python. Everything described in the post was tested on Ubuntu 18.04 LTS environment.
2. How to setup
As of the time of posting (2020.09), to use vim-lsp, you need to install the vim 8.2 version. So to install it, go to the C++ section of the vim-lsp section and install the corresponding versino. When using ycm, it was confirmed that it works normally in all versions of vim. For ycm users, open a terminal and install vim with the following command.
$ sudo apt install vim
Next, install the Vundle plugin. The Vundle plugin is a plugin manager that allows you to easily download other plugins. Install the Vundle plugin with the following command.
# Make ~/.vim/bundle directory.
$ mkdir ~/.vim/bundle -p
$ cd ~/.vim/bundle
$ git clone https://github.com/VundleVim/Vundle.vim
If the Vundle plugin has been downloaded successfully, you are ready to install other plugins. After downloading either vimrc1(ycm), vimrc2(vim-lsp), move it to the home folder(~/). At this time, a dot(.) must be added in front of the vimrc file name to be recognized by vim normally. And after downloading codedark theme, move it to ~/.vim/colors folder.
# Move .vimrc to home folder.
$ mv  ~/Downloads/vimrc1_ycm  ~/.vimrc
# or
$ mv  ~/Downloads/vimrc2_lsp  ~/.vimrc

# Move codedark.vim to ~/.vim/colors folder.
$ mkdir ~/.vim/colors -p
$ mv  ~/Downloads/codedark.vim  ~/.vim/colors
Next, install the plugins. First, open the .vimrc file.
$ vim ~/.vimrc
If the .vimrc file is open, run the :BundleInstall command. When the command is executed normmaly, several plugins registered in the .vimrc file are installed sequentially according to the Vundle plugin. If it was completed normally, all functions were installed normally except for the automatic completion function of youcompleteme and vim-lsp.
2.1. youcompleteme setting
(You only need to use one of the youcompleteme or vim-lsp plugin settings)
youcompleteme (ycm) plugin is a code completion and code navigation plugin that can be used in vim. ycm plugin does not work imeediately after downloading, but can be used through a separate installation.
First, download it through Vundle and then move it to the ~/.vim/bundle/youcompleteme folder.
$ cd ~/.vim/bundle/youcompleteme
Next, install ycm. ycm supports autocompletion of various languages, but this post installs only the modules appropriate to the C++/Python development environment. As far as I know, python is automatically completed without installing a separate module. Therefore, only the C++ autocompletion module will be installed.
# Current folder: ~/.vim/bundle/youcompleteme/
# Install ycm (for c++)
$ python3  ./install.py  --clang-completer
If the installation is successfully completed, copy the .ycm_extra_conf.py file to the ~/.vim folder. The role of the .ycm_extra_conf.py file is described in the next section.
# Copy .ycm_extra_conf.py to ~/.vim
$ cp  ~/.vim/bundle/youcompleteme/third_party/ycmd/.ycm_extra_conf.py  ~/.vim/
2.1.1. C++
The previously copied ~/.vim/.ycm_extra_conf.py file reads the standard header file from /usr/include, /usr/local/include folder, and then automatically completes the standard headers installed in the system. Therefore, in the case of C++, automatic completion of standard headers such as vector, map and algorithm becomes possible. However, the autocompletion function for classes, member functions, and member variables arbitrarily decalred by the developer is not supported. In order to perform automatric completion of arbitrarily declared functions and variables, proceed in the following order. But AFAIK, this feature is applied only to the cmake project.
- When building in cmake project, add -DCMAKE_EXPORT_COMPILE_COMMANDS=1 option to create compile_commands.json file in build folder. Even if the code is not necessarily built by make command, if only the json ifle is created, it is possible to code navigation.
-
# In cmake project, make build folder and go to the folder. $ mkdir build $ cd build # This option creates 'compile_commands.json' file. $ cmake -DCMAKE_EXPORT_COMPILE_COMMANDS=1 .. - Copy the ~/.vim/.ycm_extra_conf.py file to the top of the cmake project and set the compile_commands.json file created earlier as a link file at the top of the project.
-
# Copy .ycm_extra_conf.py file to the root of the cmake project. $ cp ~/.vim/.ycm_extra_conf.py /path/to/cmake/project/ # Create a soft link of compile_commands.json file to the cmake project root path. $ cd /path/to/cmake/project/ $ ln -s ./build/compile_commands.json ./ - Type the path where the compile_commands.json link file exists in the compilation_database_folder variable on line 107 of .ycm_extra_conf.py
-
# Open .ycm_extra_conf.py $ vim /path/to/cmake/project/.ycm_extra_conf.py # At line 107, there is compilation_database_folder variable. compilation_database_folder='./' - Start programming after running vim in the top folder of the cmake project.
As above, whenever you create a new cmake project, copy .ycm_extra_conf.py to the top-level project folder and proceed as above to use the autocompletion and code navigation function for the arbitrarily delcared codes.
If all settings are completed normally, you can use the autocompletion function for the arbitrarily written code and standard header code as above.
And code navigation is also possible as above.
2.1.2. Python
If you want to navigate Python code with ycm plugin, unlike C++, if you open the file without a specific process, the code is automatically recognized. Therefore, as described above, if the .ycm_extra_conf.py file is located in the ~/.vim/.ycm_extra_conf.py path, code navigation is possible in any path.

As above, code autocompletion and navigation to functions and variables become possible.
2.2. vim-lsp setting
(You only need to use one of the youcompleteme or vim-lsp plugin settings)
2.2.1. C++
As a result of testing based on the current (2020.09), vim-lsp did not work properly in vim 7.x, 8.0, 8.1 versions, and only vim 8.2 version worked normally. In addition, code navigation is possible only when clangd-9 version or higher is installed. Therefore, in this section, we used Ubuntu 18.04 LTS, vim 8.2 and clangd-9 versions. Vim 8.2 version can be used after downloading the source code form vim ftp site and building it through installation script. clangd-9 can be installed with the following command.
$ sudo apt install clangd-9
Unlike ycm, vim-lsp is automatically recognized if a compile_commands.json file exists as a link file at the top of the cmake project without using .ycm_extra_conf.py file. Therefore, proceed as follows.
- When building in cmake project, add -DCMAKE_EXPORT_COMPILE_COMMANDS=1 option to create compile_commands.json file in build folder. Even if the code is not necessarily built by make command, if only the json ifle is created, it is possible to code navigation.
-
# In cmake project, make build folder and go to the folder. $ mkdir build $ cd build # This option creates 'compile_commands.json' file. $ cmake -DCMAKE_EXPORT_COMPILE_COMMANDS=1 .. - Make the compile_commands.json link file created earlier to the top of the project.
-
# Create a soft link of compile_commands.json file to the cmake project root path. $ cd /path/to/cmake/project/ $ ln -s ./build/compile_commands.json ./ - Start programming after running vim in the top folder of the cmake project.

If all settings are completed normally, you can use the autocompletion function for the arbitrarily declared code and standard header code like ycm.

And code navigation is also possible as well as ycm.
2.2.2. Python
In the case of Python, unlike C++, autocompletion is supported without an compile_commands.json file. However, in order to use this feature in vim-lsp, a program caleed pyls must be installed in the system.
pyls can be easily installed with the following command.
# Install pyls
$ pip install python-language-server --user

# Check pyls is installed successfully
$ pyls --help
As above, it is possible to automatically complete the code and navigation to functions and variables in the same way as ycm.
3. My vim configuration
This section describes various general features and plugin features of vim that I use. The .vimrc file can be downloaded from vimrc1(ycm), vimrc2(lsp). The keybinding is set arbitrarily by the author, so you can change it as much as you want.
3.1. General features
In the Original keybindings section, the basic keybinding of vim itself is described. If the keybinding is arbitrarily changed, it is described in the Custom keybindings section. There are numerous features and keybindings in vim, but I have not explained them all, and I have focused on the keybindings that are actually used frequently.
Control keybinding is expressed as <C-{...}> and Alt keybinding is expressed as <A-{...}>. (NORMAL), (INSERT) and (VISUAL) refer to each mode.
3.1.1. Original keybindings
(NORMAL) Moves the cursor up, down, left and right. Usually used instead of arrow keys
Change to (INSERT) to (NORMAL) mode
(NORMAL)=>(INSERT) 모드로 변경한다. a,i는 현재 커서에서 한 칸 앞뒤에서 모드를 변경하며 A,I는 현재 라인의 맨 앞과 뒤로 이동한 후 모드를 변경한다.
Change to (NORMAL) to (INSERT) mode. a,i keys change the mode one space before and after the current cursor, and A,I keys change the mode after moving to the beginning and the end of the current line.
When changin to (NORMAL) to (INSERT) mode, s key changes the current cursor by erasing the space, and S key changes by erasing the entire current line.
Change to (NORMAL) to (INSERT) mode. o key changes the mode one space below the curernt line, and O key changes the mode one space above the current line.
(NORMAL) Delete the code of the current line. dd key deletes an entire line and D key deletes all spaces after the current cursor.
(NORMAL) Copy/paste the code of the current line. Copy/paste caused by y and p keys is not saved in the clipboardand is used only in vim. In other words, it is impossible to copy to other programs like Ctrl + c and Ctrl + v. p key is pasted one space below the curent cursor and P key is pasted one space above.
Change to (NORMAL) to (VISUAL) mode. (VISUAL) mode has the same effect as selecting through mouse drag, and various keybindings such and d,y,s keys can be applied. v key can select the (VISUAL) mode in units of one column, and V key changes the entires current line to the (VISUAL) mode.
(VISUAL) Custom area called visual block can be selected. It is maninly used in conjunction with the a,i,s,y,p keys.
(NORMAL) Changes one word of the current cursor. You can change it without going to (INSERT) mode.
(NORMAL) Moves to the top or bottom of the current file. gg moves to the top and G moves to the bottom.
3.1.1.12 u
(NORMAL) Undo the changes.
(NORMAL) Moves the cursor to the center of the screen.
(NORMAL) MOves the cursor quickly by one page. Use the C-u key to move up, and the C-d key to move down.
(NORMAL) Increments the number at the back of the current cursor by 1.
(NORMAL) Search for a specific word. n searches downward and N searches upwards.
(NORMAL) Copy/paste the selected area to the clipboard. It is the same copy/pasted as regualr Ctrl + C and Ctrl + v.
(NORMAL) Open a specific file. :e! means to open another file without saving the currently changed code.
(NORMAL) Save the current file
(NORMAL) Close the current file. :q! means to close the currently changed code without saving it.
(NORMAL) Changes a specific word collectively
(NORMAL) Splits the window vertically
(NORMAL) Splits the widnow horizontally
(NORMAL) Moves multiple windows
(NORMAL) Move to several previously opend buffers. For example, in the case of coding in the order of files A->B->C->D, you can navigate in the order of files D->C->B->A with the <C-o> key. If you want to go back again, just use the <C-i> key
3.1.2 Custom keybindings
(NORMAL) When searching for a variable or function, the word is highlighted, and pressing t will cancel the highlighting.
(INSERT) Deletes a word from the current cursor. You can erase words right away without changing to (NORMAL) mode.
(NORMAL) Create a blank space one space below the current cursor. You can create b lanks without changing to (INSERT) mode.
(NORMAL) Move multiple windows.
(NORMAL) Restores the undoed work again (redo)
(NORMAL) Immediately exit without saving the curernt file. It is the same command as :q!
(NORMAL) Navigates the code quickly by space. Originally, the keybindings was { and }, but I changed it to , and .
(NORMAL) Displays the full path of the current file in the status window
Perform undo in (INSERT) mode. You can undo immediately without going to the (NORMAL) mode.
(NORMAL) Changes the same words as the word currently in the cursor at once. %s requires you to type the word directly, but this command automatically selects the word at the cursor.
(NORMAL) Moves to the front and back of the current line. Even after moving, the mode remains (NORMAL) without changing to the (INSERT) mode.
(NORMAL) Increases the size of the current window
3.2 Plugin Features
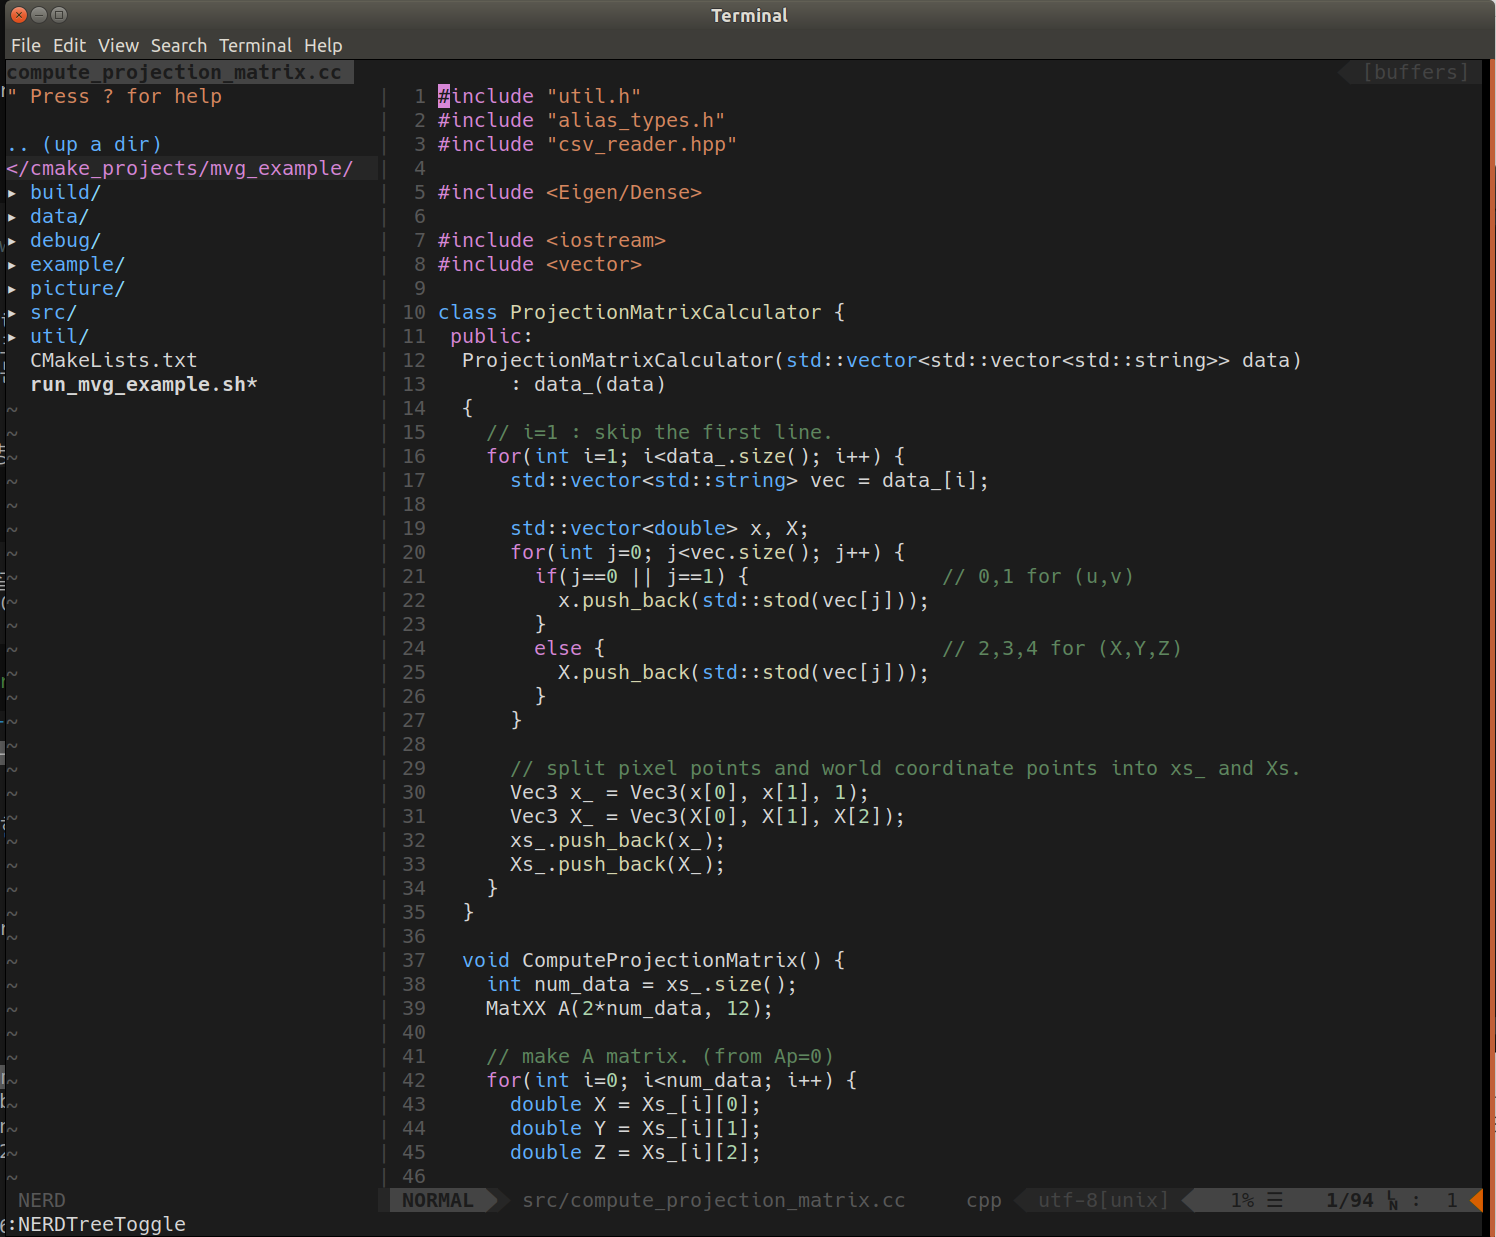
3.2.1 The-NERD-tree
The-NERD-tree is a plugin that allows you to view the list of files in the current folder
(NORMAL) Execute NERD tree
3.2.2 snipMate
This plugin displays snippets previously saved when you press Tab after entering a specific keyword.
3.2.3 tComment
This plugin allows you to easily apply comments through shortcut keys
(NORMAL) Comment on the current line or selected area.
3.2.4 EasyMotion
This plugin is to quickly navigate between codes
(NORMAL) Quickly move forward and backward based on the curernt cursor
3.2.5 Mark
This plugin highlights words

(NORMAL) Marks the word currently at the cursor. You can mark with <F5> and cancel all with <F4>
3.2.6 tagbar
This plugin outputs function and variable information

(NORMAL) Displays information on functions and variables of the current file. ctags must be installed. Install ctags with the command below.
$ sudo apt install ctags
3.2.7 youcompleteme, vim-lsp
Plugins that automatically completes code, navigates, and check syntax. The picture above shows checking for incorrect syntax. Both youcompleteme and vim-lsp are explained at once because they are provide the same feature in the C++/Python development environment.
(NORMAL) Moves to the definition of the function or variable of the current cursor. Move though <A-.> and return to the original position through <A-,>
(NORMAL) Displays the references to which the function or variable is used.
3.2.8 vim-airline
This plugin shows various information on the status bar at the top and bottom of the vim screen.
(NORMAL) Moves to the next buffer and the previous buffer through the q,w keys. You can close the current buffer via c key
3.2.9 vim-gitgutter
This plugin displays code changes by git version control
Displays code changes through git when it is detected. As above, the code changes are displayed on the left side
(NORAML) Use the gn and gp keys to quickly navigate the code changes
(NORMAL) If there is a code change history at the current cursor, undo it.
3.2.10 vim-diminactive

This plugin highlights the current window when multiple windows are open
3.2.11 AutoClose
This plugin automatically completes parenthesis (), {}, [], etc.
3.2.12 vim-indent-guides
This plugin automatically indents the code. In the .vimrc file, if the variable let g:indent_guides_enable_in_vim_startup is set to 1, it is applied when vim starts. and if it is set to 0, the plugin is not applied when vim is started.
3.2.13 vim-fugitive
This plugin makes you to use git commands with :G{command} prefix. e.g., :Gdiff, :Gblame
3.2.14 vim-cpp-enhanced-highlight
This plugin highlights C++ code with decent colors. Vim basically does not properly highlight C++ code, so it is used for readability.
'English' 카테고리의 다른 글
| [En] Notes on Lie Theory (SO(3), SE(3)) (0) | 2023.01.17 |
|---|---|
| [En] Notes on Plücker Coordinate (0) | 2023.01.17 |
| [SLAM][En] Errors and Jacobian Derivations for SLAM Part 2 (0) | 2023.01.17 |
| [SLAM][En] Errors and Jacobian Derivations for SLAM Part 1 (0) | 2023.01.17 |
| [SLAM][En] Notes on Formula Derivation and Analysis of the VINS-mono (0) | 2023.01.16 |


